
Creating and Using Code Snippets in Xcode
There are pieces of code that I type over and over again.
Sometimes it is a familiar SwiftUI view with the same modifiers. Sometimes it is the outline of a function, a testing helper, or a block of code with several values that need to be replaced. Copying that code from another project works, but only if I can remember which project contains the version I want.
Xcode code snippets gives you a better option. A snippet is a reusable code template that lives in Xcode's Library. It can be inserted from the Library or offered directly by code completion after you type a shortcut.
I covered the basic workflow in my video, Creating, Using and Sharing Xcode Snippets. This was the second video I ever created, so even though it was published in January 2020, it is still valid today.
In this post I want to revisit the subject and spend more time on the details that determine whether a snippet feels helpful or frustrating: its scope, its completion shortcut, its placeholders, and how to move it safely to another Mac.
Opening the Code Snippet Library
Choose View > Show Library, or use Shift-Command-L, and select the Code Snippets section of the Library.
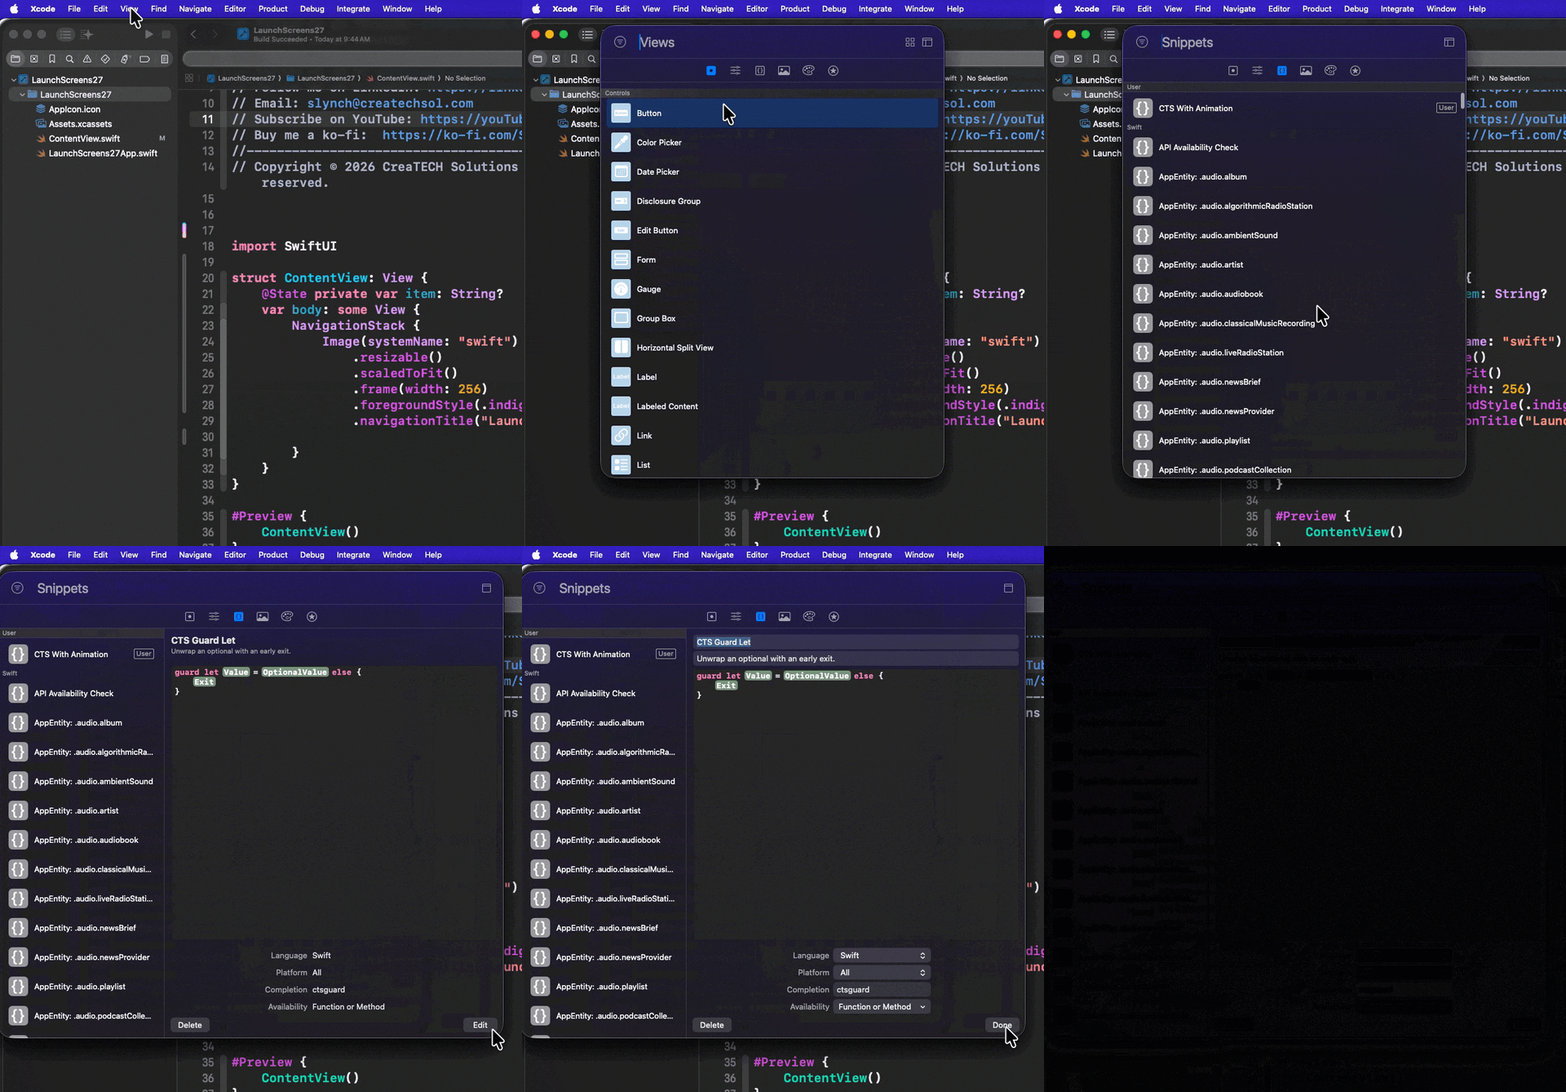
Any snippets that you have created appear at the top of the library and have the User tag applied to them. Those that ship with Xcode are below the user-generated ones and are categorized by language.
Snippet Details
You can show each snippet's details by first clicking on the show details button on the navigation bar and then, any selected snippet code will be displayed along with the language, platform, completion, and availability.
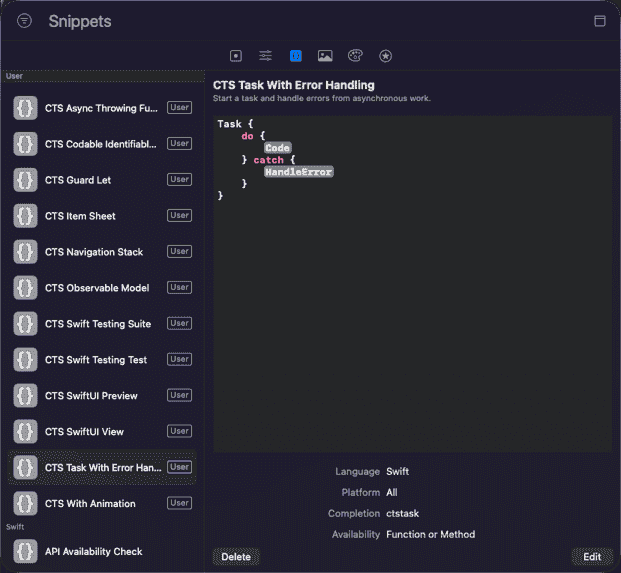
This example indicates that this is a Swift snippet that is available on all platforms and is triggered by typing the completion shortcut ctstask, but it is only offered within a Function or Method.
Using a Snippet
There are two straightforward ways to insert one:
- Open the Library, find the snippet, and drag it into the editor.
- Type its completion shortcut and select it from Xcode's completion list.
Dragging is useful when you know the snippet's title but have forgotten its shortcut. Completion is faster for snippets you use regularly.
After insertion, move through the placeholders (see placeholders below) with Tab and Shift-Tab. Then read the completed code. A snippet saves typing, but it does not understand the surrounding code or guarantee that the inserted API is still the right one.
That last point matters. Snippets are copied into the source file; they are not references back to a single shared implementation. Updating the saved snippet does not update code that was inserted into older projects.
Creating a Snippet
Suppose you frequently create a prominent button in a SwiftUI view:
Button("Save") { save()}.buttonStyle(.borderedProminent)To turn it into a snippet:
- Select the code in Xcode's source editor.
- Right-click the selected code, or hold down the Control key while clicking it, then choose Create Code Snippet. You can also choose Editor > Create Code Snippet from the menu bar.
If you have the code selected, your code will be inserted into the body of the snippet editor.
Tip: If the selected code is indented, the snippet will capture those leading spaces or tabs. To exclude that indentation, hold down the Option key while selecting so that you can begin the selection at the start of the code block.
- Give the snippet a meaningful title and summary.
- Add a completion shortcut. Typically, you will use a prefix to distinguish or categorize your snippets.
- Choose the language, platform, and scope. (More on this below.)
- Click Done.
The title and summary help when searching the Library. The completion shortcut and scope control when the snippet appears while you type.
Add Placeholders Before Saving
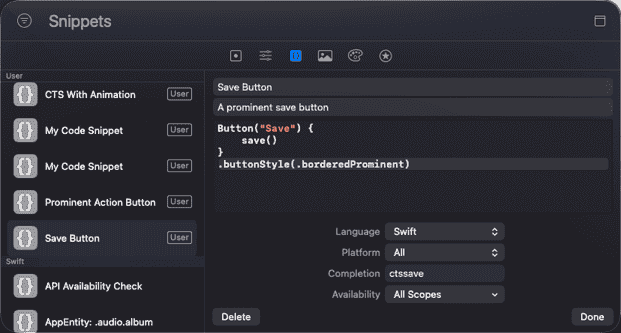
A copied block of code is useful. A template is better. If you have already saved your snippet, you can open the Snippet Library, reveal the details pane, select the snippet and click the Edit button.
Xcode recognizes text between <# and #> as a placeholder. I could edit the button before saving it so that it looks like this:
Button("<#Title#>") { <#Action#>}.buttonStyle(.borderedProminent)As soon as you enter the closing #>, the editor will look like this:
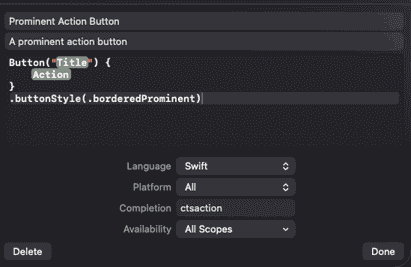
Make sure that you also update the title, summary, and completion shortcut accordingly before saving the update.
When the snippet is inserted, Xcode highlights Title. You then type the button title, press Tab, and replace Action with the code that the button should run.
Placeholder names should describe what belongs there. <#Title#> and <#Action#> are much more useful six months from now than <#value1#> and <#value2#>.
You can also use the same placeholder name more than once when it represents the same idea, but Xcode does not treat repeated placeholders like a live variable. Review every inserted value before considering the generated code complete.
Completion: Give the Snippet a Memorable Trigger
The completion field is the text that causes Xcode to offer the snippet in its completion list.
For the button example, you might use:
ctsactionWhen you type ctsaction in an appropriate location, the custom snippet appears among Xcode's suggestions.
Since I use the prefix cts (CreaTECHSnippet) for all of my snippets, when I start typing
ctsI get all of the snippets that might be available in that scope.
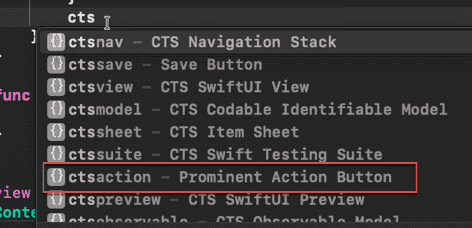
Pressing Return inserts it.
A good completion shortcut should be:
- Short enough to remember.
- Long enough to avoid accidental matches.
- Distinct from Swift keywords and common API names.
- Consistent with the other snippets you create.
The best completion shortcut is not necessarily the shortest one. If a two-character shortcut fills the completion list every time those characters are typed, it creates more friction than it removes.
The completion shortcut does not behave like a global text-expansion hotkey. Xcode offers it only when the language and scope of the current editor location match the snippet’s language and scope settings.
That brings us to the setting that causes most of the confusion.
Scope: Tell Xcode Where the Snippet Belongs
Scope describes the kind of source-code location in which Xcode should offer a snippet. Depending on the language and version of Xcode, the choices can include:
- All
- Top Level
- Class Implementation
- Function or Method
- Code Expression
- String or Comment
Think of scope as a filter, not as an access-control rule. It does not change what the inserted Swift code can do. It changes where the snippet appears in code completion.
For example:
| Snippet | Sensible scope |
|---|---|
A complete struct or class declaration | Top Level |
| A stored property or method declaration | Class Implementation |
| Statements that belong inside a function | Function or Method |
| A SwiftUI view or view modifier | All (most reliable inside a result builder) |
| A documentation template | String or Comment |
| A snippet intended to work almost anywhere | All |
For the SwiftUI button, Code Expression may appear to be the obvious choice because the snippet produces a view expression. In practice, Xcode does not always classify positions inside SwiftUI result builders in the same way as ordinary expressions or function bodies. All is the most reliable scope for a snippet that must appear throughout a SwiftUI body or another @ViewBuilder closure.
If the completion shortcut does not appear, move the cursor to a location where the selected scope makes sense and try again. If it appears in too many irrelevant places, narrow the scope. All is convenient while testing, but it is not always the best final setting.
This is also why two snippets can use similar completion text without always colliding. A top-level type template and a statement intended for a function can be separated by scope.
SwiftUI ViewBuilder Is a Special Case
A SwiftUI body looks like a normal computed property, but the content is processed by a result builder. Xcode can therefore treat the cursor as being in a view-expression or modifier context rather than in an ordinary Function or Method code block.
For example, consider this view:
var body: some View { NavigationStack { Image(systemName: "swift") .resizable() .scaledToFit() }}A NavigationStack snippet and a .sheet modifier snippet may be perfectly valid here but still be absent from completion if they were saved with Function or Method scope. For small SwiftUI view and modifier snippets, use All when dependable completion is more important than keeping the completion list narrowly filtered.
Where Xcode Stores Custom Snippets
Custom snippets are stored for the current macOS user in:
~/Library/Developer/Xcode/UserData/CodeSnippets/Each custom snippet is a property-list file with a .codesnippet extension. The file contains values such as its title, summary, Swift source, completion prefix, completion scopes, language, and unique identifier.
This location explains two important things:
- A snippet is available across Xcode projects on the same Mac.
- A snippet is not automatically part of any one project's Git repository.
NOTE: If you create a useful snippet on your desktop Mac, it will not simply appear on your MacBook because you pushed the app project to GitHub. The snippet lives in Xcode's user data, outside that project.
Moving Snippets to Another Mac
The simplest sharing method is to copy the .codesnippet files.
On the source Mac:
- Quit Xcode so that it is not updating the snippet files while they are copied.
- In Finder, choose Go > Go to Folder.
- Enter
~/Library/Developer/Xcode/UserData/CodeSnippets/. - Copy the required
.codesnippetfiles to a safe location.
On the destination Mac:
- Quit Xcode.
- Open the same
CodeSnippetsfolder. Create it if it does not exist. - Copy the
.codesnippetfiles into the folder. - Relaunch Xcode and check the Code Snippet Library.
To make individual files easier to identify, you can rename the UUID-looking files in Finder to descriptive names such as:
CTS-SwiftUI-View.codesnippetCTS-Item-Sheet.codesnippetKeep these rules in mind:
- Preserve the
.codesnippetextension. - Give every file a unique filename.
- Leave
IDECodeSnippetIdentifierunchanged inside the file. - Quit Xcode before renaming, then relaunch it.
Keeping a Portable Snippet Collection in Git
For more than one or two snippets, you can keep a separate repository containing copies of the .codesnippet files. That gives you a history of changes and a portable source that is independent of any app project.
A simple collection might look like this:
XcodeSnippets/├── README.md└── CodeSnippets/ ├── SwiftUI-Button.codesnippet ├── SwiftUI-Preview.codesnippet └── Async-Function.codesnippetThe filenames in Xcode's own folder are commonly based on identifiers, so the friendly filenames mentioned above can be helpful. However, the identifier inside each file still matters. Preserve it when moving the same snippet between computers.
You can also include a short README that lists each completion shortcut and expected scope. This makes the collection understandable without opening every property list.
In the video referenced at the beginning of this post, I demonstrate how to replace Xcode’s CodeSnippets directory with a symbolic link to a folder managed by Git or synchronized through cloud storage. This provides automatic synchronization across computers, but it can also introduce conflicts or incomplete updates. A manual copy-and-backup workflow is less automated, but it is easier to understand and recover if something goes wrong. The best approach depends on your needs.
Final Thoughts
Code snippets are a small Xcode feature, but they can remove a surprising amount of repetition.
The important part is not merely saving a piece of code. A useful snippet has clear placeholders, a memorable completion shortcut, and a scope that matches the location where the code belongs. Once the underlying .codesnippet files are backed up, the collection can follow you to another Mac.
Start with one piece of code that you typed twice this week. Turn it into a snippet, give it a recognizable prefix, and choose the narrowest practical scope. If you continue to use it, add it to a portable collection.
That is usually how the best developer tools begin: not as a grand system, but as a small improvement to something developers do every day.